Staff may use these resources to more effectively work remotely and collaborate with coworkers. If you have any questions or need additional support, please contact our Service Desk by calling 803/323-2400 or sending an e-mail to servicedesk@winthrop.edu. For online teaching resources, please visit the Winthrop Office of Online Learning (WOOL) webpage for Continuity of Instruction.
If you have a smartphone, there are several document scanning apps available. We recommend Office Lens for both iPhones (iOS) and Android devices.
To change your password from off campus, visit the Change Password page.
For instructions on how to set up your All-in-One machine, please watch this short video.
Yes. There are two ways you can receive voicemails from your office phone while you are off campus.
Winthrop University’s voicemail system allows any e-mail account to receive voice mail messages. Please remember that the Enabled Voicemail (EVM) features will only be activated on your mailbox after you set up the required options.
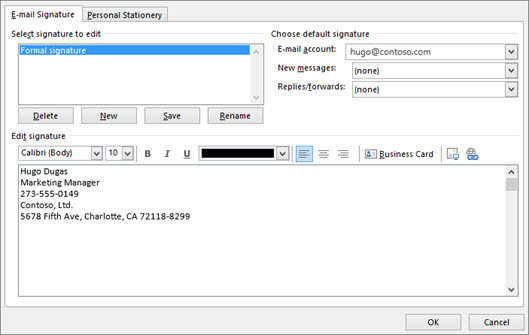
1. In your e-mail, find an old sent e-mail and copy (CTRL+C) your signature.
2. In Outlook, open a new e-mail message.
3. On the Message menu, select Signature > Signatures.

4. Under Select signature to edit, choose New, and in the New Signature dialog box, type a name for the signature such as "Winthrop Signature."
5. Under Edit signature, compose your signature. You can change fonts, font colors, and sizes, as well as text alignment. If you want to create a more robust signature with bullets, tables, or borders, use Word to format your text, then copy and paste the signature into the Edit signature box. You can also use one of our pre-designed templates for your signature. Download the templates in Word, customize them with your personal information, and then copy and paste them into the Edit signature box.

To receive access to the VPN, ask your supervisor to request VPN access for you. Your supervisor will need to send an e-mail to servicedesk@winthrop.edu requesting access. Once your request has been processed, the Service Desk will send you a short security training to complete and then instructions for setting up and connecting to the VPN.
NOTE: Under normal circumstances, employees complete the VPN Request Form and submit to their supervisor for a signature. Once this form has the necessary department signatures, it should be attached to the e-mailed request to the Service Desk. For expedited service, this process has been suspended for some employees for the COVID-19 response.
NOTE: You will need to be connected to the VPN before you can access a shared drive. To request VPN access, please as your supervisor to send a service request to servicedesk@winthrop.edu.
If you have an ACC account, your Z: drive will be automatically accessible from both your WIN account and your ACC account. So, if you save a file to your Z: drive while you are in the office, the file will be available when you log on at home.
Once you have VPN access and are logged into it, you can enable your remote desktop using these steps:
Once you are connected, it will be the same as sitting at your desktop machine on camps. When you are ready to disconnect, click the X on the bar with the computer name (xxxxxx.win.winthrop.edu) and then disconnect from the Global Protect VPN.
NOTE: These instructions are written for Windows PC. Steps for enabling remote desktop on a Mac may vary. For assistance, please contact the Service Desk.
If you are working on a Winthrop-issued device, you likely have university-approved security software already installed. If you are working on a personal device, we recommend you install Symantec Endpoint Security software. You can access the installation link and more information on our Technology Purchases page. Symantec is free using your Winthrop account.
Microsoft Teams is a collaboration tool built into our Winthrop Office package. All faculty and staff have access to this application. You can use Teams to chat with coworkers one-on-one or in a group, make audio or video calls, share files, and organize projects and tasks. If you do not already have Teams on your device, visit the Microsoft Teams download page and download the application by following these steps:
1. Click the “Download Teams” button.
2. The Teams application will start to download. You may see the file appear at the bottom of your browser window.
3. Once the download is complete, click on the Teams installer executable and the Microsoft Teams application will begin to install.
4. When the installation is complete, you will see the login screen. Use your Winthrop e-mail and password to log in.
To create a team, you will need to request one from the Service Desk. Please follow these steps:
1. Send an e-mail to (or call) the Winthrop University IT Help Desk servicedesk@winthrop.edu or 803/323-2400. Be sure to include the desired name of the team and the team owner.
2. You will receive an e-mail message when the team has been created. Once you have the confirmation e-mail message, open Teams on your computer or go to the Microsoft Teams download page and download the application.
Take some time to become familiar with the Teams window.
Here you can navigate to the various sections in Microsoft Teams. From the top, you’ll see the following icons:
Above, the Teams icon is selected in the App bar, so the list of the teams we are members of are displayed here.
A dedicated section within a Team to organize conversations and tasks into specific topics or projects.
Clicking this button takes you through the process of joining a team. This button is only visible when the Teams icon is selected in the App bar.
Clicking this button selects the Chat icon in the App bar and allows you to start a new chat with an individual or a group.
This bar at the top is used to query apps or perform a search in Teams.
Switch between different Teams pages with these tabs. Conversations and Files are automatically included; the + sign tab allows you to add shortcuts to content in Teams.
This section displays all the conversations in the selected channel. Chats in Channel Conversations are persistent, so if you’ve been away, it’s easy to scroll through to get caught up when you get back. Chats can include visual indicators such as the @mention, which indicates that the chat specifically mentions a user, or a red bang to indicate high importance. Take note that chats are open by design so everyone in the team has visibility to the conversation to help speed up the decision-making process when needed.
This is where you can type a message to start a conversation. You can send a quick chat or expand the Compose box to access rich formatting tools.
When you’re ready to share your chat, click the Send icon to post your chat to the team.
On a Teams call, you can:
To start a call, you do not need to create a team. Simply search for the user in the search bar at the top of the screen. When you find the correct contact, click on their name and then click on the blue phone icon in the upper right corner.
![]()
If you have already been chatting with the person you want to call, click on their profile photo and click the phone icon.
![]()
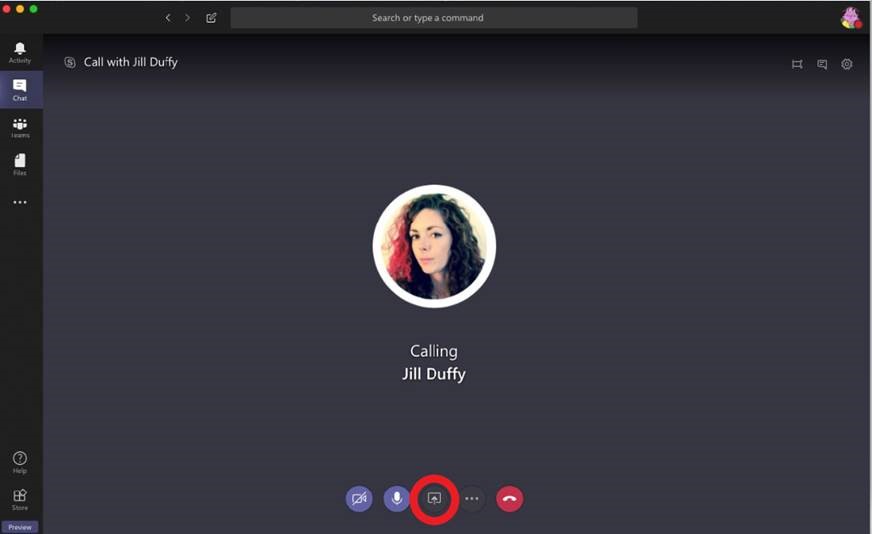
Once the call begins, you can choose to share your screen by clicking the icon circled below. To end the call, click the red phone icon.

Go to the Files tab and click the Upload button to upload a file. Once the file is uploaded, click the name of the file to open it. Once opened, you can start a conversation with others regarding the document.
Let’s say for example you are chatting with three members of your team about an issue. After a lengthy back and forth and waiting times in between, you decided it’s much faster to just get on a call and talk about the issue. To start an impromptu meeting:
A conference window will open with a pane on the right where you can invite others to join the meeting.
You can set up a formal meeting ahead of time and give the invited participants enough notice about a meeting. Like Outlook, formal meeting requests in Teams include a Meeting Title (the equivalent of Subject in Outlook), Location, Start and End Date or Time, Details, and a list of participants. In Teams, you can select a channel to meet in. When a channel is selected, artifacts from the meeting are posted in the channel.
1. Click Meetings from the Apps bar.
2. Click the Schedule a Meeting button that appears at the bottom of the left pane.
3. From the New meeting window, enter the Title, Location, Start and End Date/Time,
Details, Channel, and the names of the people you want to invite to the meeting.
Optionally, you can add a channel for the meeting.
4. If you want to check people’s availability, click Schedule Assistant above the Details section to display your participants’ availability based on their Outlook calendars.
5. Click the Schedule a Meeting button. The meeting is now scheduled and will appear in the Meetings section in Teams as well as in your Outlook calendar.
Yes, Microsoft Teams is available on a wide range of mobile platforms including iPhones and Androids in addition to their compatibility on laptops and desktop computers. To use Teams on your mobile device, search Microsoft Teams in the App Store or on Google Play.

For a more information about Teams, you can reference our Microsoft Teams Guide or watch this Teams training video.